This post may contain affiliate links. By browsing this website, you agree to our disclaimer, privacy policy, and terms of use.
Did you know that many conventional candles release harmful toxins similar to secondhand smoke? These toxins can affect your indoor air quality and health.
But don’t worry — this easy guide will show you how to make DIY non-toxic candles at home using safe, natural ingredients.
For me, lighting a candle at the end of the day has always been a cozy ritual, bringing instant calm with its warm flicker.
However, when I noticed headaches and irritation after burning my usual candles, I started researching what was really inside them.
After conducting some research, I found that most candles are made with paraffin wax (a petroleum byproduct), synthetic fragrances that often contain phthalates and even metal-core wicks.
These ingredients release toxic compounds into the air you breathe and linger in your home long after the flame goes out. Once I learned this, I tossed all of my candles immediately.
But I really missed being able to light my candles in the evening. So I decided to figure out how I would make my own with only non-toxic ingredients.
Turns out it’s a lot easier than you might think. Most candles only take 3 or 4 ingredients to make!
With just a few simple ingredients like beeswax, soy wax, and pure essential oils you can create candles that smell amazing, burn cleanly, and won’t give you a headache! Plus it can save you a bunch of money in the long run.
In this guide, I’ll walk you through two of my favorite beginner-friendly recipes to make DIY non-toxic candles, as well as what to look out for when choosing good, non-toxic ingredients.
The Best Non-Toxic Wax Options
When it comes to making your own non-toxic candles, choosing the right wax is very important.
The two safest, and most readily available options are beeswax and soy wax. Which you choose depends on your own preferences.
I personally love beeswax because it has a long burn time and gives off a light, sweet scent reminiscent of honey.
That said, beeswax is an animal-derived product, so it may not be the right choice if you’re vegan.
Soy wax is a great vegan-friendly alternative. Made from soybean oil, it has a smooth, creamy finish and is an excellent base for essential oils.
It’s also more budget-friendly than beeswax, making it ideal for beginners. When shopping for soy wax, look for non-GMO or organic options to avoid pesticide exposure.
The Best Non-Toxic Wick Options
The wick you use is just as important as the wax. Look for cotton or hemp wicks, which burn cleanly and are free from harmful metals or chemical treatments.
Avoid metal-core wicks, which may contain lead or zinc. These can release toxic fumes when burned, especially in older or unregulated candle products.
Wick sizing matters too. A wick that’s too small can create a weak, flickering flame. A wick that’s too large may burn too hot, melt wax too fast, or produce excess soot.
Check the diameter of your container and wax type to find the right size, many online suppliers include helpful wick-sizing charts.
A general rule of thumb:
- For containers 2–3 inches wide, use a small to medium wick.
- For containers 3–4 inches, use a medium to large wick.
- For anything over 4 inches, you may need two wicks spaced evenly apart.
The Best All-Natural Fragrance Options (If Using)
To keep your candle truly non-toxic, skip synthetic “fragrance oils” and stick with pure essential oils.
Essential oils are plant-derived and offer a wide variety of scents without the endocrine disruptors and allergens commonly found in artificial fragrances.
These are some of my favorite essential oils for making candles with because they have excellent scents:
- Lavender – calming, classic
- Lemongrass – fresh and clean
- Peppermint – invigorating
- Sweet Orange – bright and cheerful
Most homemade candle recipes call for 30–40 drops of essential oil per 8 oz of wax, though this depends on oil potency and personal preference.
Bonus Tip: Adding a small spoonful of coconut oil to your wax blend can help the scent carry farther and produce a smoother burn.
2 DIY Non-Toxic Candle Recipes To Make At Home
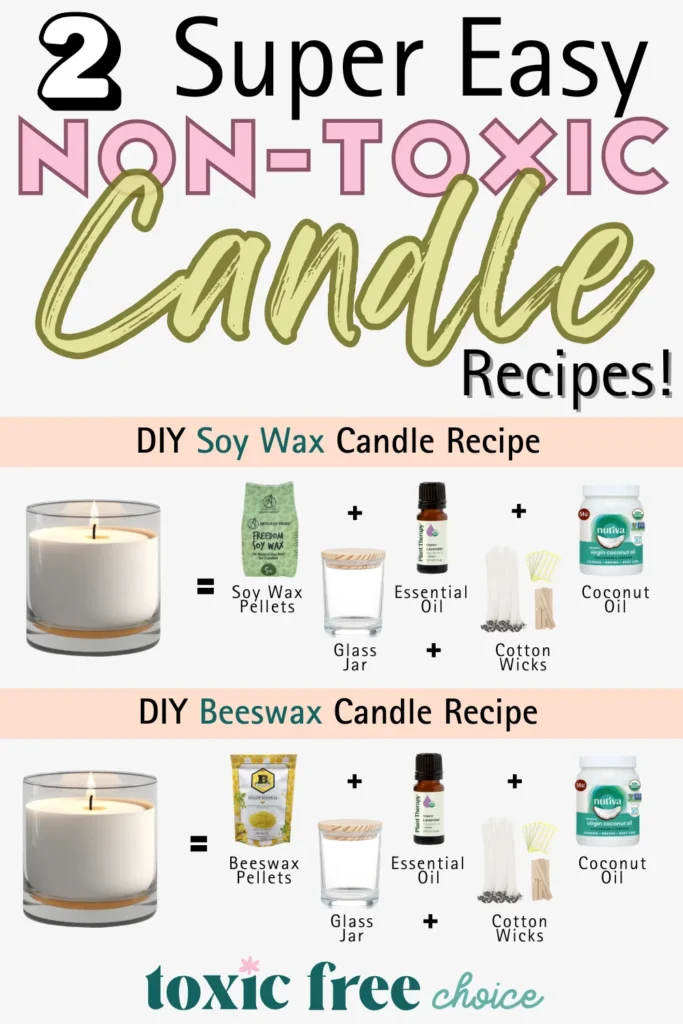
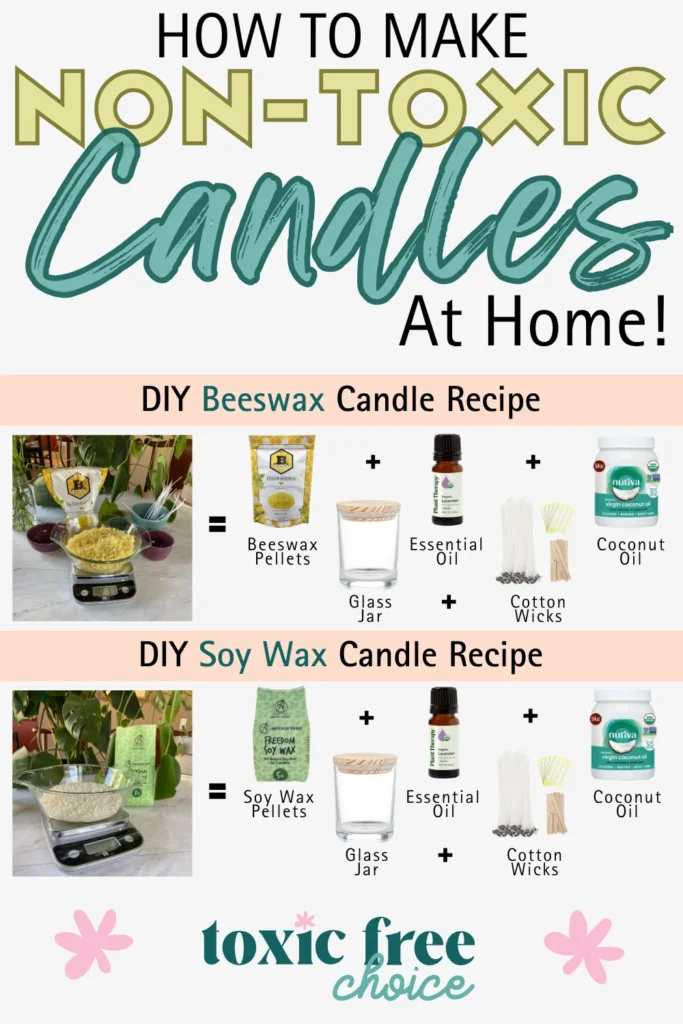
1. Super Simple DIY Beeswax Candle Recipe
From: Nesting With Grace | With added safety tips & troubleshooting for beginners
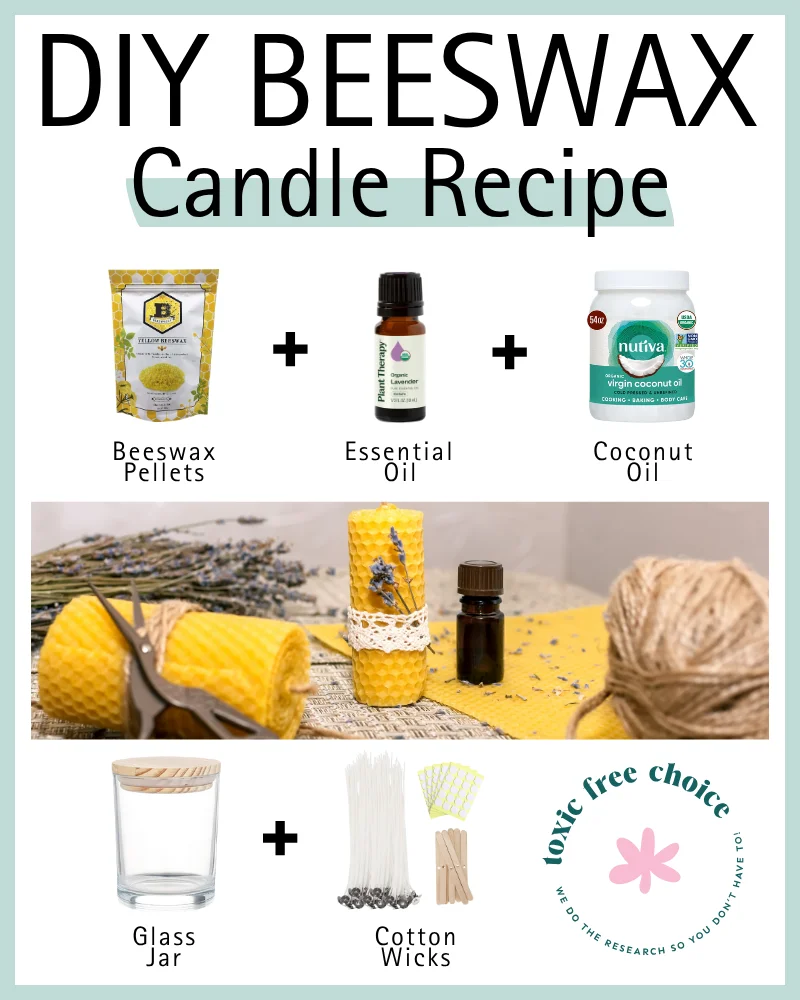
Ingredients:
- 1 lb. beeswax pellets or block (grated)
- 1/2 cup coconut oil (optional, for better scent throw)
- 30-40 drops essential oils (optional)
- Cotton wicks
- Glass jars or tins
Instructions:
- Melt the beeswax and coconut oil (if using) in a double boiler or a dedicated candle-making pitcher over low heat.
- Once melted, remove from heat and stir in essential oils, if desired.
- Prepare your jars by securing the wicks to the bottom with a small amount of melted wax or wick stickers.
- Carefully pour the melted wax into the jars, holding the wicks centered and upright.
- Allow the candles to cool completely before trimming the wicks to 1/4 inch.
Tips:
- To avoid cracking, let the candles cool slowly at room temperature and avoid moving them until fully set.
- If your candle “tunnels” (burns down the center), try trimming the wick shorter or using a larger diameter wick.
2. Super Simple DIY Soy Wax Candle Recipe
Inspired By: 100 Days of Real Food | With scent & safety enhancements
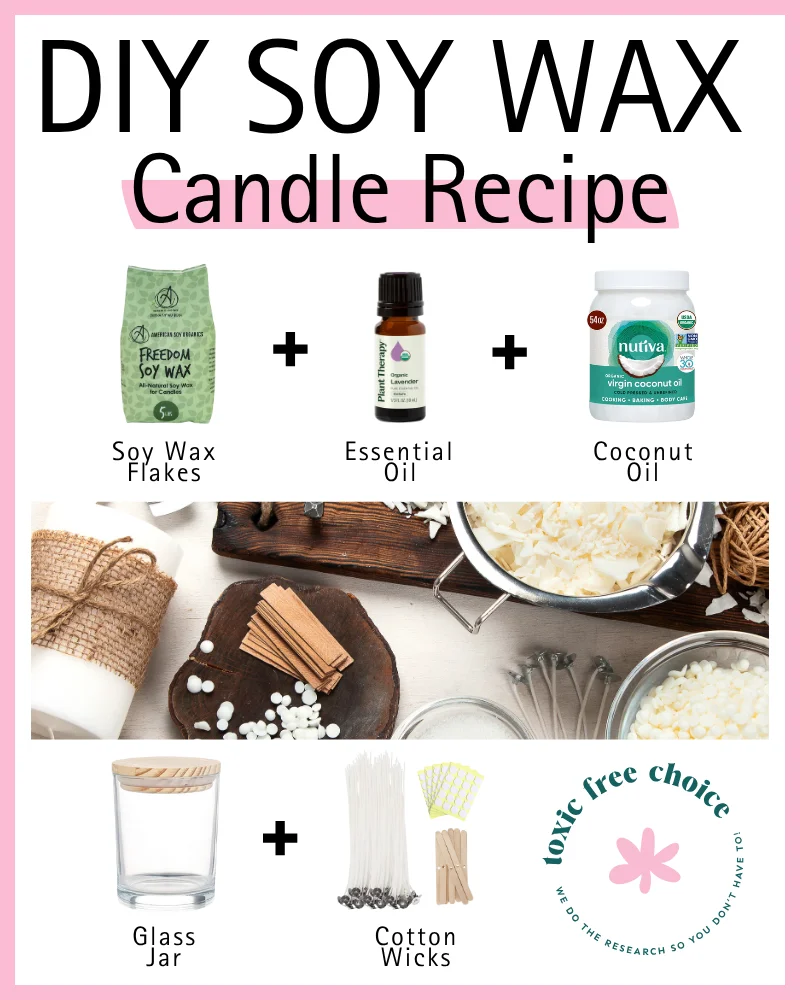
Ingredients:
- 2 cups soy wax flakes
- 1/2 cup coconut oil (optional, for a creamier texture)
- 30-40 drops essential oils
- Cotton wicks
- Glass jars or tins
Instructions:
- Melt the soy wax and coconut oil (if using) in a double boiler or a dedicated candle-making pitcher over low heat.
- Once melted, remove from heat and let cool for 2-3 minutes before stirring in essential oils.
- Prepare your jars by securing the wicks to the bottom with a small amount of melted wax or wick stickers.
- Carefully pour the melted wax into the jars, holding the wicks centered and upright.
- Allow the candles to cool completely before trimming the wicks to 1/4 inch.
Tips:
- For the best scent throw, avoid adding essential oils when the wax is too hot, as this can cause the fragrance to evaporate.
- If your candle surface looks uneven after cooling, try using a hair dryer on low heat to gently remelt the top layer for a smoother finish.
No Double Boiler? Try This Easy Crockpot Candle Method
No double boiler? No problem. The crockpot method is one of the easiest ways to make a big batch of candles with less mess.
If you’re a beginner, making candles with kids, or want to create a large batch of candles at once, the crockpot method is a no-fuss, easy-to-clean option that simplifies the candle-making process.
Step-By-Step Crockpot Process
- Place the wax (beeswax or soy wax) in the crockpot and set it to low heat.
- Stir occasionally until the wax is completely melted, which may take 30 minutes to an hour.
- Carefully remove the melted wax from the crockpot and stir in your essential oils, if desired.
- Prepare your jars by securing the wicks to the bottom with a small amount of melted wax or wick stickers.
- Pour the melted wax into the jars, holding the wicks centered and upright.
- Allow the candles to cool completely before trimming the wicks to 1/4 inch.
Tips For Easy Cleanup & Adapting Batch Sizes:
- For super easy cleanup, use a crockpot liner. (Yeah, we’re not huge fans of single-use plastic usually, but wax is a beast to remove completely!)
- Alternatively, dedicate a specific crockpot solely for candle making to avoid any wax residue in your food. Trust us on this one!
- An Instant Pot on slow cook mode also works great for melting wax.
Mess-Minimizing & Pouring Hack:
- Have you got a plastic takeout container heading for recycling? Score!
- Carefully remove the plastic liner with the melted wax from the heat.
- Snip a hole in the liner away from the hot wax.
- Pour the hot wax directly into the takeout container. This keeps any spoons or ladles clean and makes pouring into candle jars way easier.
Candle Care 101: How to Make Your DIY Candles Last Longer
To get the most out of your non-toxic candles here are a few simple care tips to follow:
- Burn It Right The First Time: Your first burn sets the “memory” of your candle. Let it melt across the entire surface before blowing it out, about 1 hour per inch of container diameter. This prevents tunneling and keeps future burns even.
- Trim The Wick Before Each Use: Always trim the wick to about 1/4 inch before lighting. This helps reduce smoke, soot, and “mushrooming” (when the wick curls and builds up carbon).
- Don’t Burn For Too Long: Limit each burn session to about 3–4 hours max. Longer burns can cause the jar to overheat or lead to smoky residue on the container.
- Store Candles The Smart Way: Keep your candles in a cool, dry place, away from direct sunlight. This preserves their color, scent, and shape, especially when you’re using natural waxes or essential oils.
- Know When To Stop Burning: When there’s only 1/2 inch of wax left, it’s time to retire the candle. Burning too close to the bottom can crack glass containers or pose fire risks.
- Extinguish With Care: Snuff out the flame gently to avoid splattering wax. A candle snuffer is ideal, but blowing gently across the top also works in a pinch.
Fun Ways To Customize Your DIY Candles (Scents, Add-Ins & More)
One of the best parts of making your own candles is the ability to customize them to your preferences.
Here are some fun ideas to make your candles totally yours:
- Embed dried herbs, flowers, cinnamon sticks, or coffee beans into the wax for a decorative touch and added scent.
- Use natural ingredients like beetroot powder, spirulina, or turmeric to add a subtle hint of color to your candles.
- Create seasonal scent combinations like citrus and mint for summer, cinnamon, and clove for fall, or pine and cedarwood for winter.
- Repurpose unique containers like vintage teacups, mason jars, or even hollowed-out fruits for an eco-friendly and eye-catching candle vessel.
Burning Candles Safely: Tips for a Toxin-Free, Fire-Safe Home
Essential Oil Safety
- Avoid using essential oils that are not recommended for burning, such as citrus oils, which can be irritating when heated.
- Always use essential oils in moderation, following the dilution guidelines for candle-making (typically 30-40 drops per 8 ounces of wax).
- If you’re pregnant, have pets, or live with young children, consult with a healthcare professional or veterinarian before using certain essential oils.
Air Quality Awareness
- Even natural candles can produce small amounts of volatile organic compounds (VOCs) when burned, so it’s essential to ensure proper ventilation by opening a window or using an air purifier.
- If you have severe sensitivities or respiratory issues, consider using an essential oil diffuser or room spray as an alternative to candles.
Fire Safety Basics
- Never leave a burning candle unattended, and always keep candles away from flammable objects like curtains, paper, or clothing.
- Place candles on a stable, heat-resistant surface and keep them out of reach of children and pets.
- Extinguish candles by gently blowing them out or using a candle snuffer, ensuring the wick ember is no longer glowing.
That said, most people can enjoy a well-made natural candle safely—just remember to crack a window now and then.
Small changes, like making your own non-toxic candles can be a powerful way to reclaim your space & create a healthier home!
With just a few simple ingredients and some mindful choices, you can create candles that not only smell amazing but also support cleaner air, safer spaces, and a deeper sense of well-being.
And while it might seem like a small change, making your own non-toxic candles can have a lasting impact.
You’re reducing exposure to harmful chemicals, minimizing waste, and saying yes to products that are better for your health.
Better still? When you share your DIY creations or pass along what you’ve learned, you inspire others to make healthier choices too.
That’s how change spreads! One thoughtful action, one homemade candle at a time.
Check out our other amazing DIY articles:
- Non-Toxic Room Sprays & Air Fresheners | Store-Bought & DIY
- Non-Toxic DIY Natural Deodorant Recipes
- Non-Toxic Lotions | Store-Bought & DIY
- DIY Non-Toxic Makeup Recipes
- Ways To Use Castile Soap
- Homemade Body Wash
Like It? Pin It!